Nuxt.jsを使ってTodoリストを作ってみる


Vue.jsとNuxt.js
Vue.js(ヴュー ジェイエス)はWebページのUI(ユーザーインタフェイス)作成にフォーカスしたJavaScriptフレームワークです。直感的に開発でき、導入や習熟のしやすさ、日本語ドキュメントが充実していることが特徴です。
Nuxt.js(ナクスト ジェイエス)は、Vue.jsベースのJavaScriptのフレームワークで、UIに特化しているVue.jsに加えて、Webページ構築に有用なUI以外の機能(Ajaxやサーバーサイドレンダリングなど)などををまとめて利用できる環境を提供してくれます。
なぜTodoリストを作るのか
Todoリストを作ることによって、Vue.jsのデータバインディングの仕組みや、Nuxt.jsのVuexストアを利用した状態管理の仕組みが理解しやすくなります。
また、規模も大きくないので、全体像が把握しやすいことも理由として挙げられます。
機能と作成手順
今回のTodoリストの機能は以下の4つとなります。
- 「タスクの追加」機能
- 「タスクの削除」機能
- 「タスクの状態変更」機能
- 「タスクの絞り込み」機能
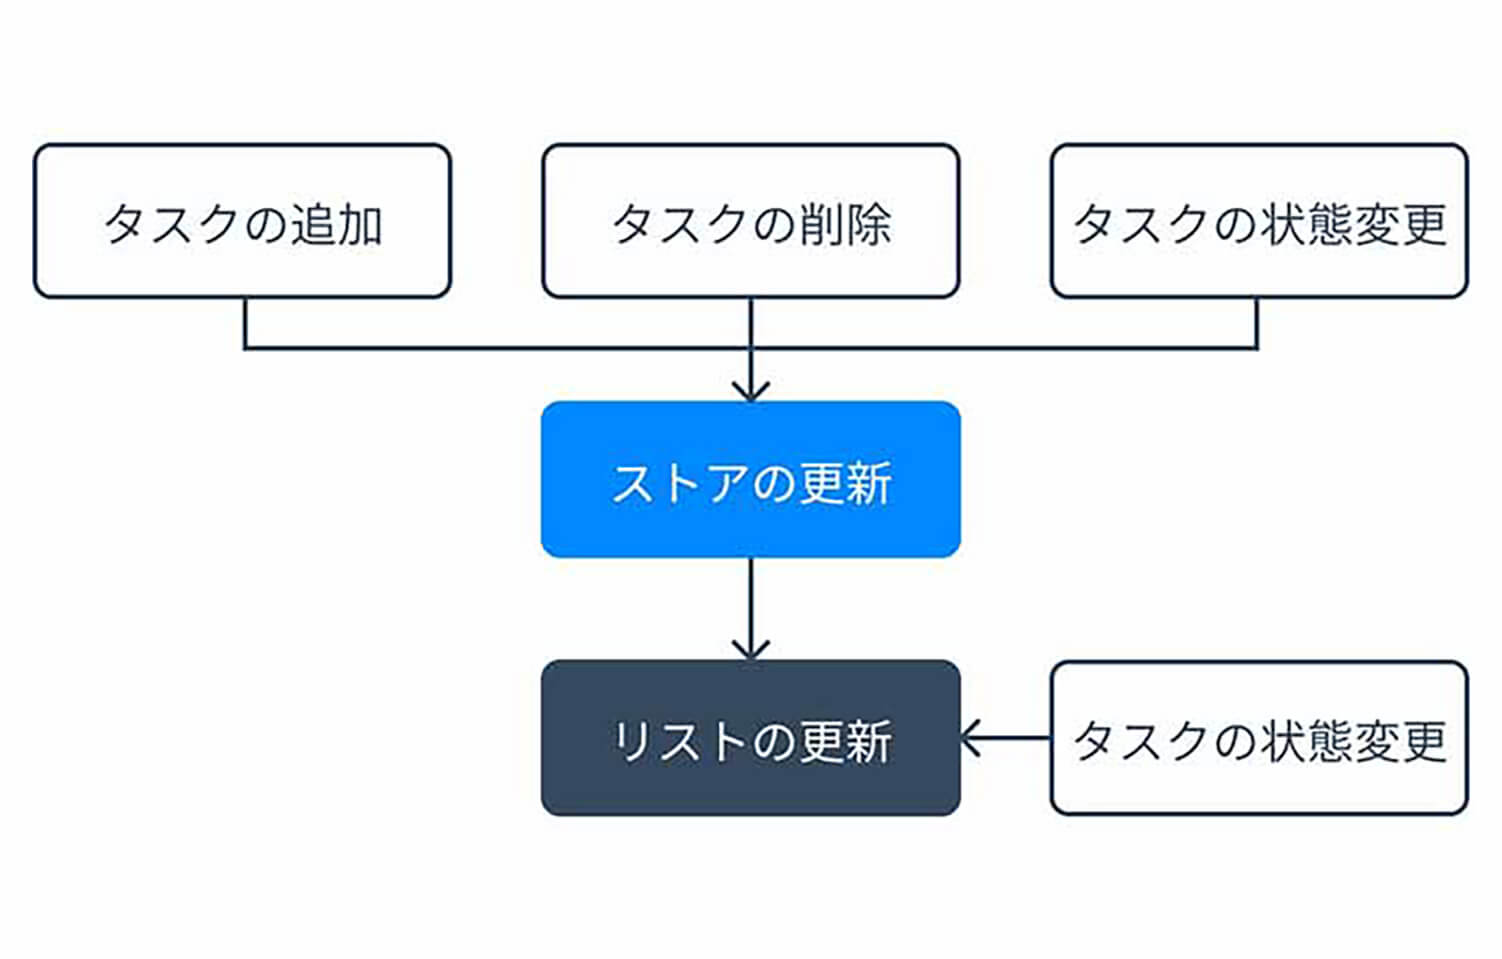
また、以下の手順で作成していきます。
- node.jsのインストール
- Nuxt.jsのインストール・プロジェクトの作成
- ひな形作成
- 「タスクの追加」機能の実装
- 「タスクの削除」機能の実装
- 「タスクの状態変更」機能の実装
- 「タスクの絞り込み」機能の実装
node.jsのインストール
まずnode.jsをインストールします。
node -v
Nuxt.jsのインストール・プロジェクトの作成
Nuxt.jsにはプロジェクト作成ツールとして create-nuxt-app が用意されています。
今回はこれを使ってsampleという名前のプロジェクトを作成します。
npx create-nuxt-app sample
いくつか質問がされます。用途や目的に合わせて選択していきます。
? Project name (sample)
プロジェクト名です。デフォルトでは先ほど指定したプロジェクト名になります。今回の場合「sample」です。
? Project description (My spectacular Nuxt.js project)
プロジェクトの説明です。デフォルトの文言はいくつか用意されている中からランダムで表示されます。
? Author name ()
作者名を入力します。gitに登録している場合は、登録名が自動で入ります。
? Choose programing language (Use arrow keys)
> JavaScript
  TypeScript
使用する言語をJavaScriptとTypeScriptから選べます。今回はJavaScriptを選択します。
? Choose a package manager (Use arrow keys)
> Yarn
  Npm
パッケージを管理できるパッケージマネージャーをyarnとnpmから選びます。今回はnpmに慣れているのでnpmを選択しました。
? Choose UI framework (Use arrow keys)
> None
  Ant Design Vue
  Bootstrap Vue
  Buefy
  Bulma
  Element
  Framevuerk
  iView
  Tachyons
  Tailwind CSS
  Vuetify.js
UIフレームワークを選択することができます。今回は使用しないのでNoneを選択します。
? Choose custom server framework (Use arrow keys)
> None (Recommended)
  AdonisJs
  Express
  Fastify
  Feathers
  hapi
  Koa
  Micro
サーバーサイドのフレームワーク を選択できます。今回は使用しないのでNoneを選択します。
? Choose Nuxt.js modules (Press <space> to select, <a> to toggle all, <i> to invert selection)
> ( ) Axios
  ( ) Progressive Web App (PWA) Support
  ( ) DotEnv
よく使われるモジュールを複数選択して導入することができます。
- 非同期通信を用いて外部APIを扱う際に使われるAxios
- Webアプリをモバイルアプリのように使えるPWA(プログレッシブWebアプリ)の作成をサポートするnuxt pwa
- 環境変数を管理できるDotEnv
が選択できます。
今回はどれも使用しないので選択せずに進みました。
? Choose test framework (Use arrow keys)
> None
  Jest
  AVA
テストフレームワークを選択します。JESTとAVAが選べますが、今回は使用しないのでNoneを選択します。
? Choose rendering mode (Use arrow keys)
> Universal (SSR)
  Single Page App
NuxtのモードをUniversal(サーバーサイドレンダリング)かSPA(シングルページアプリケーション)かを選べます。今回は実装が簡単なSPAを選択しました。
? Choose development tools (Press <space> to select, <a> to toggle all, <i> to invert selection)
> ( ) jsconfig.json (Recommended for VS Code)
  ( ) Semantic Pull Requests
開発時に使うツールを選択することができます。
jsconfig.json を設定しておくと、VS Codeで開発する際に正しくシンタックスエラーやハイライトが出るようになります。
Semantic Pull Requests はGitのcommitメッセージとPull Requestにおけるタイトルの付け方をチェックしてくれます。
今回はどちらも使用しないので選択しませんでした。
すべての項目を設定するとプロジェクトが生成されます。
ディレクトリ構造は以下のようになっています。
sample
├── assets/
├── components/
├── layouts/
├── middleware/
├── node_modules/
├── pages/
├── plugins/
├── static/
├── store/
├── .editconfig
├── .gitegnore
├── nuxt.config.js
├── package.json
├── package-lock.json
└── README.md
- assets
CSSやSass、フォントなど、コンパイルされないファイルを入れるディレクトリです。 - components
Vue.jsのコンポーネント(部品)を入れるディレクトリです。全ページで使用するヘッダーやフッターなどをコンポーネントとして分けてこのディレクトリに入れます。 - layouts
画面全体の基本的なレイアウトを定義するvueファイルが置かれたディレクトリです。 - middleware
アプリケーションのミドルウェアを入れるディレクトリです。ミドルウェアを使用することで、ページやレイアウトをレンダリングするより前に実行されるカスタム関数を定義できます。 - pages
アプリケーションのビュー及びルーティングファイルを入れるディレクトリです。pagesディレクトリのすべてのvueファイルを読み、ページをレンダリングします。 - plugins
Vue.jsアプリケーションをインスタンス化する前に実行したいJavaScriptプラグインを入れるディレクトリです。 - static
変更される可能性が低い静的ファイルを置くディレクトリです。staticディレクトリに配置されたファイルは直接サーバーのルートに配置されます。 - store
Vuexストアのファイルを入れるディレクトリです。Vuexストアについては後ほど説明します。 - nuxt.config.js
Nuxt.jsのカスタム設定を記述するファイルです。 - package.json
インストールしたパッケージやスクリプトの一覧とバージョンが記載されているファイルです。
生成されたsampleディレクトリに移動して実行します。
cd sample
npm run dev
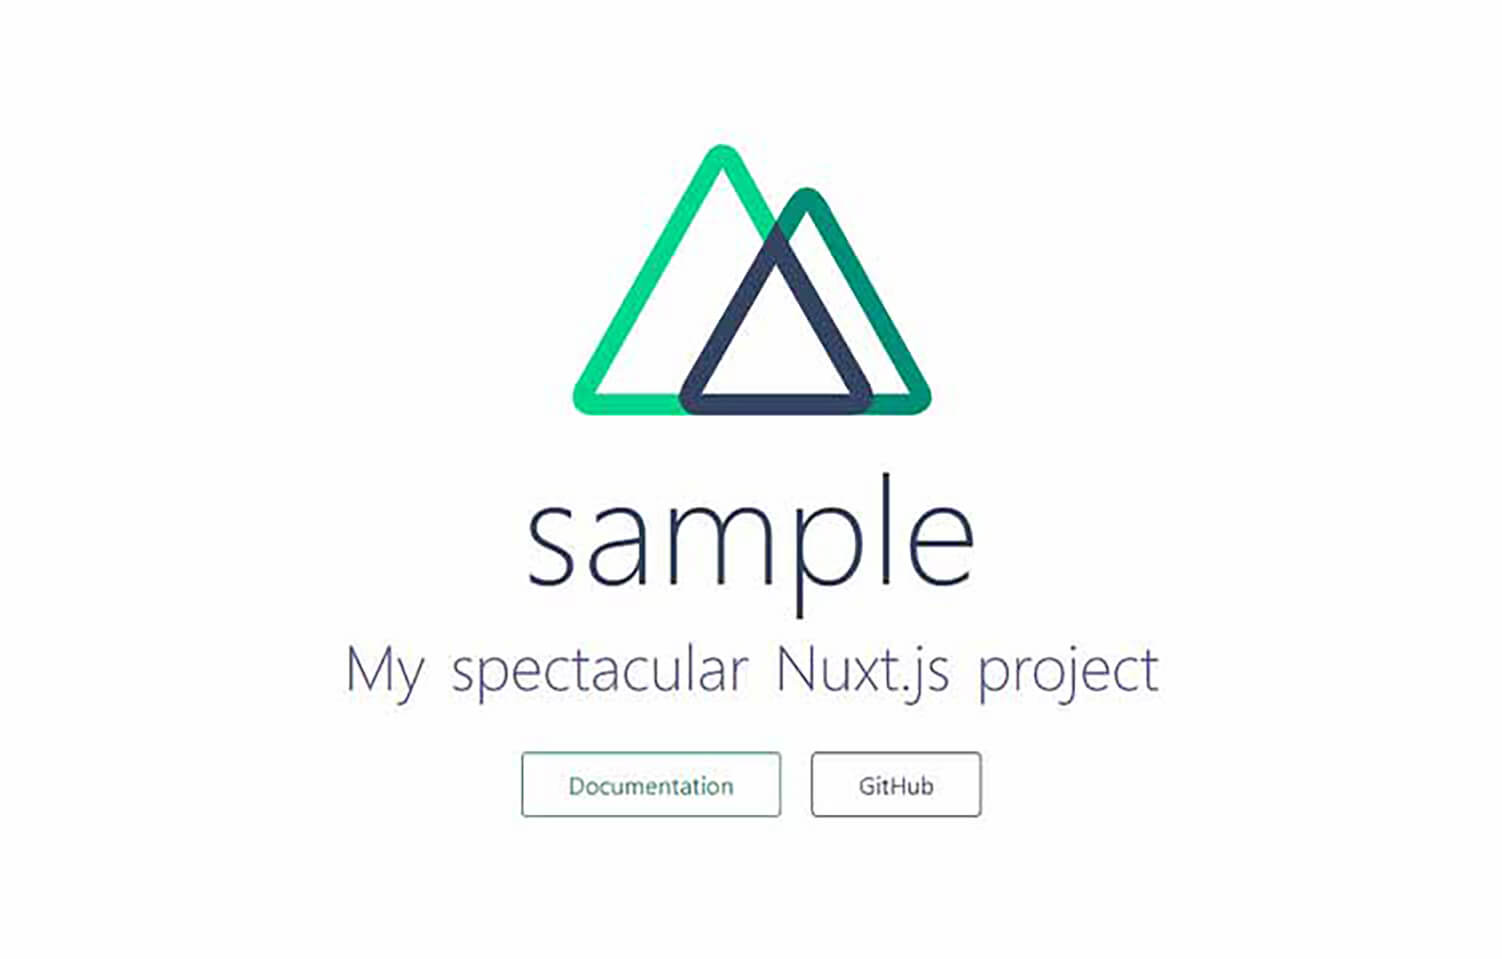
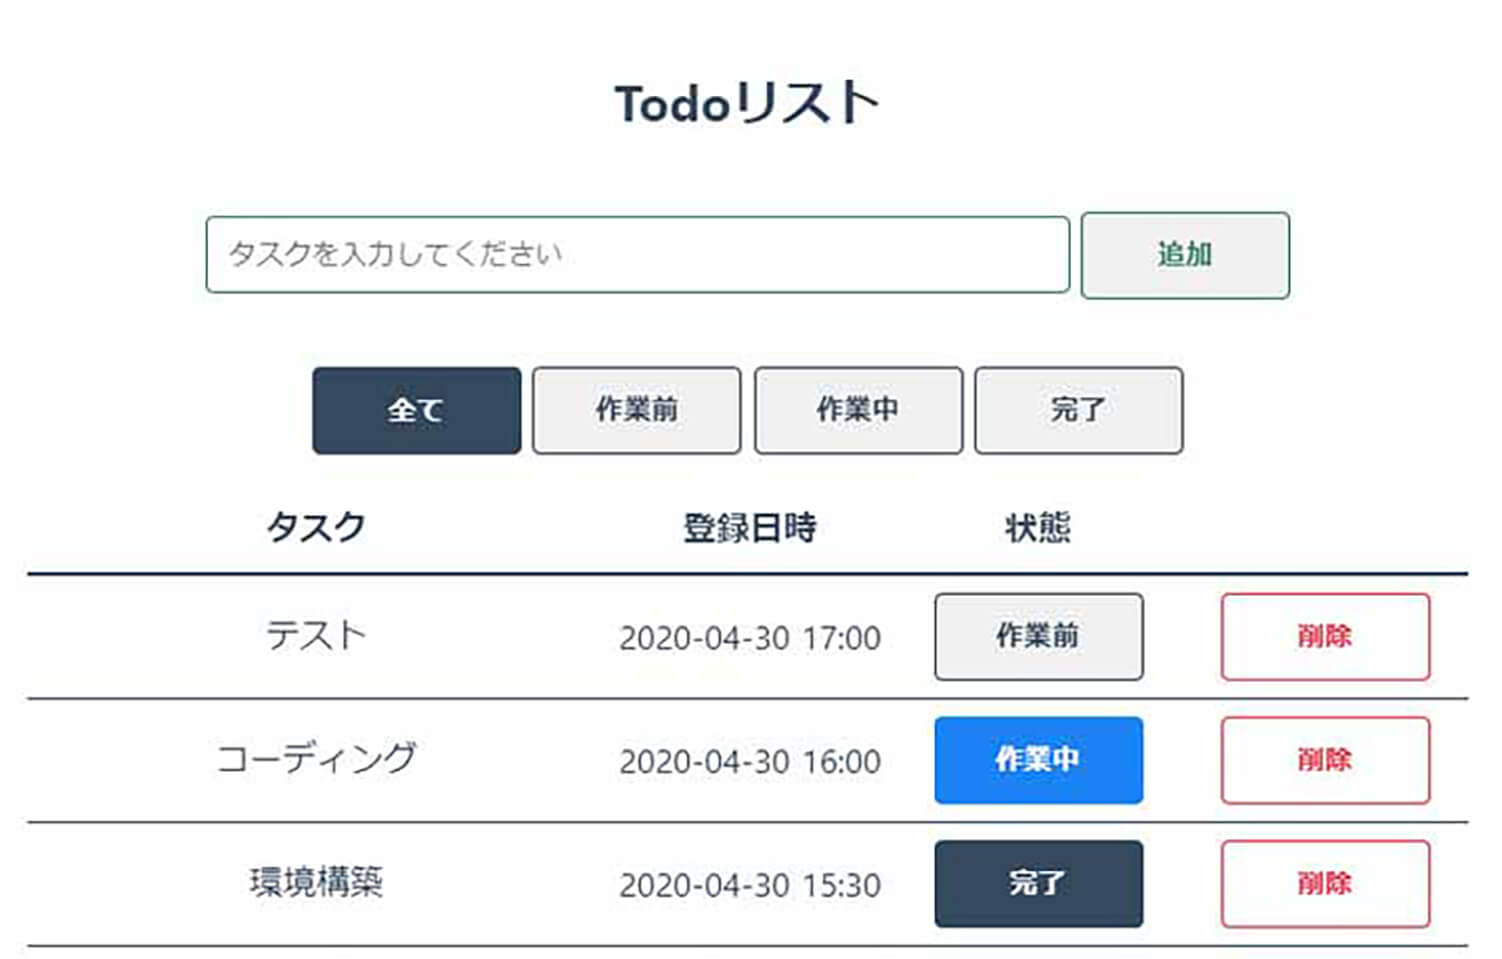
localhost:3000にアクセスして、以下の画面が出ていればプロジェクトの作成は完了です。
ひな形作成
Nuxt.jsの準備ができたので、さっそくTodoリストを作っていきます。
まず、ひな形をHTMLの形式で作ります。
作成したプロジェクトのpagesディレクトリにあるindex.vueファイルを開いて、以下のように編集します。
<!-- pages/index.vue -->
<template>
  <section class="container">
    <h1>Todoリスト</h1>
    <div class="addArea">
      <input type="text" name="addName" id="addName" placeholder="タスクを入力してください">
      <button id="addButton" class="button button--green">追加</button>
    </div>
    <div class="Filter">
      <button class="button button--gray is-active">全て</button>
      <button class="button button--gray">作業前</button>
      <button class="button button--gray">作業中</button>
      <button class="button button--gray">完了</button>
    </div>
    <table class="Lists">
      <thead>
        <tr>
          <th>タスク</th>
          <th>登録日時</th>
          <th>状態</th>
          <th> </th>
        </tr>
      </thead>
      <tbody>
        <tr>
          <td>テスト</td>
          <td>2020-04-30 17:00</td>
          <td><button class="button button--yet">作業前</button></td>
          <td><button class="button button--delete">削除</button></td>
        </tr>
      </tbody>
    </table>
  </section>
</template>
<script>
//省略
</script>
<style>
/* 省略 */
</style>
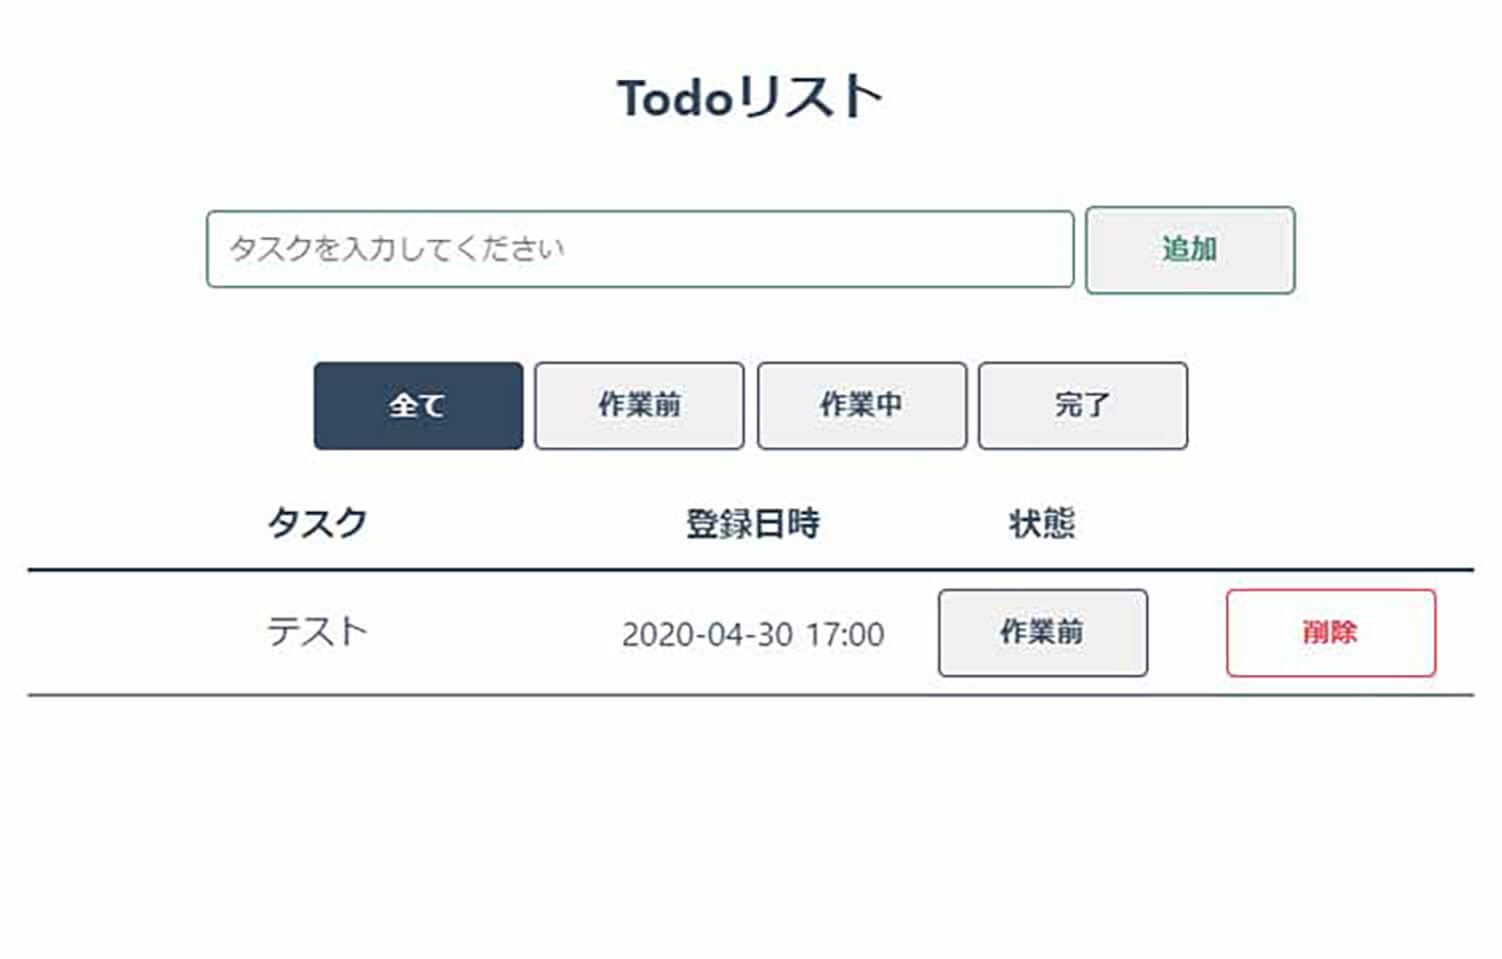
リストの部分には仮のタスクを設定しておきます。
Vuexストアの作成
Nuxt.jsはVuexストアを通して状態を管理します。
ストアでは、すべてのページで利用するデータをまとめて保管できます。
storeディレクトリにindex.jsを作成し、stateを記述します。
// store/index.js
import Vuex from 'vuex';

const createStore = () => {
  return new Vuex.Store({
    state: () => ({
      todos: [
        {content: 'テスト', created: '2020-04-30 17:00', state: '作業前'},
        {content: 'コーディング', created: '2020-04-30 16:00', state: '作業中'},
        {content: '環境構築', created: '2020-04-30 15:30', state: '完了'}
      ]
    }),
  })
}

export default createStore;
stateの中にtodosという配列を作り、その中にタスクのオブジェクトを記述します。
- content
タスク名です。inputで入力したタスクの名前がここに入ります。 - created
登録日時です。 - state
タスクの状態です。今回は’作業前’、’作業中’、’完了’を用意しました。
確認がしやすいよう、状態別に3つのタスクを登録しました。
次はストアの情報がページに表示されるようにしてみましょう。
pagesディレクトリのindex.vueに、仮で入力したタスクのリスト部分を以下のように変更します。
<!-- pages/index.vue -->
<tr v-for="(item, index) in todos" :key="index">
  <td>{{ item.content }}</td>
  <td>{{ item.created }}</td>
  <td><button class="button">{{ item.state }}</button></td>
  <td><button class="button button--delete">削除</button></td>
</tr>
v-for
<tr v-for="(item, index) in todos" :key="index"></tr>
v-for属性はvue.js特有の書き方で、他の言語におけるfor文にあたるものです。 先ほど登録したtodosの配列の要素分だけtrの中身を繰り返します。
Mustache構文
<td>{{ item.content }}</td>
<td>{{ item.created }}</td>
<td><button class="button">{{ item.state }}</button></td>
<td><button class="button button--red">削除</button></td>
{{ item.content }}などの、{{}}で囲む書き方はMustache構文と呼ばれるもので、vue.js特有の書き方になります。{{}}の中身と紐づけすることができます。
ここでいうitemはv-for文でtodosが代入されていますから、todosの中のcontent、つまりタスク名が入ります。
次に、script部分に以下のように記述します。
// pages/index.vue
import {mapState} from 'vuex';

export default {
  data: function() {
    return {
      content:
    }
  },
  computed: {
    ...mapState(['todos'])
  }
}
vuexからmapStateをインポートすることで、dataにストアのstateの中身を入れ、computedでtodosの中身が変わるたびに描写させるようにしています。
「タスクの追加」機能の実装
では、タスクを追加できるようにしていきましょう。
storeディレクトリのindex.jsに、以下のように記述します。
// store/index.js
mutations: {
  insert: function(state, obj) {
    var d = new Date();
    var fmt = d.getFullYear()
            + '-' + ('00' + (d.getMonth() + 1)).slice(-2)
            + '-' + ('00' + d.getDate()).slice(-2)
            + ' ' + ('00' + d.getHours()).slice(-2)
            + ':' + ('00' + d.getMinutes()).slice(-2);
    state.todos.unshift({
      content: obj.content,
      created: fmt,
      state: '作業前'
    })
  }
}
ここではまず登録された日時を取得して整形した上でcreatedに代入し、入力されたタスクをcontentに入れています。
pagesディレクトリのindex.vueを開き、inputとbuttonに以下のように記述します。
<!-- pages/index.vue -->
<input type="text" name="addName" v-model="content" placeholder="タスクを入力してください">
<button class="button button--green" @click="insert">追加</button>
v-model
<input type="text" name="addName" v-model="content" placeholder="タスクを入力してください">
v-model属性によって、inputに入力されたタスクをcontentと紐づけすることができます。(データバインディングといいます。)
contentが変わればv-model属性で紐づけされた要素も変わりますし、紐づけされた要素が変わればcontentも変わります。(双方向データバインディングといいます。)
v-on
<button class="button button--green" @click="insert">追加</button>
v-on属性を使うと、要素にイベントを設定することができます。
クリックイベントを設定するには、v-on:clickを設定します。
v-onは「@」と省略することができ、v-on:clickは@clickと書くことができます。
このv-on属性を使い、ボタンにクリックイベントを設定して、methodsのinsertを呼び出しています。
scriptのcomputedの下に、methodsを記述します。
// pages/index.vue
methods: {
  insert: function() {
    if(this.content != ''){
      this.$store.commit('insert', {content: this.content});
      this.content = '';
    }
  }
}
insertメソッドでは、storeのmutationsのinsertに、引数として入力されたタスクを渡して実行します。
このとき、inputの中身が空かどうかの判定を一度挟むことで、空のタスクが登録されないようにしています。
タスクを追加したら、contentを空にし、入力欄を空にしています。
ページ上でタスクを入力し追加ボタンを押すと、リストに追加されていれば成功です。
「タスクの削除」機能の実装
再びstoreディレクトリのindex.jsに戻り、以下のように記述します。
// store/index.js
remove: function(state, obj) {
  for(let i = 0; i < state.todos.length; i++) {
    const ob = state.todos[i];
    if(ob.content == obj.content && ob.created == obj.created) {
      if(confirm('"' + ob.content + '"を削除しますか?')){
        state.todos.splice(i, 1);
        return;
      }
    }
  }
}
ここでは、削除ボタンが押された時にtodosに登録されているすべてのタスクの中から、タスク名(content)と登録日時(created)が一致するものを探し出し、confirmを出してから削除しています。
次に、pagesディレクトリのindex.vueで削除ボタンにイベントを登録し、methodsにremoveを追加することで実装されます。
<!-- pages/index.vue -->
<td><button class="button button--red" @click="remove(item)">削除</button></td>
// pages/index.vue
remove: function(todo) {
  this.$store.commit('remove', todo)
}
「タスクの状態変更」機能の実装
まず、それぞれの状態を数字で定義するために、storeディレクトリのindex.jsを開き、stateのtodosの下にoptionを追加します。
// store/index.js
option:[
  {id:0 ,label:'作業前'},
  {id:1 ,label:'作業中'},
  {id:2 ,label:'完了'}
]
mutationsにchangeStateを追加します。
// store/index.js
changeState: function(state, obj){
  for(let i = 0; i < state.todos.length; i++) {
    const ob = state.todos[i];
    if(ob.content == obj.content && ob.created == obj.created && ob.state == obj.state) {
      let nowState;
      for(let j = 0; j < state.option.length; j++){
        if(state.option[j].label == ob.state){
          nowState = state.option[j].id;
        }
      }
      nowState++;
      if(nowState >= state.option.length){
        nowState = 0;
      }
      obj.state = state.option[nowState].label
      return;
    }
  }
}
removeと同じように、ボタンが押された時にtodosに登録されているすべてのタスクの中から、タスク名(content)と登録日時(created)と状態(state)が一致するものを探し出し、状態を変化させています。
pagesディレクトリのindex.vueを開き、状態変更ボタンに@clickでイベントを登録します。
<!-- pages/index.vue -->
<td>
  <button class="button"
          v-bind:class="{
            'button--yet':item.state == '作業前',
            'button--progress':item.state == '作業中',
            'button--done':item.state == '完了'}"
          @click="changeState(item)">
    {{ item.state }}
  </button>
</td>
v-bind
v-bindを使うことで、dataの値に応じて属性を変化させることができます。
v-bindはv-onの「@」と同様、「:」と省略することができ、v-bind:class=””は:class=””と書くことができます。 今回はitem.stateの値に応じてクラスを切り替え、スタイルを変えるようにしています。
最後に、methodsにchangeStateを追加することで、ボタンを押すたびに状態が変化するようになります。
// pages/index.js
changeState: function(todo){
  this.$store.commit('changeState',todo)
}
「絞り込み」機能の実装
pagesディレクトリのindex.vueを開き、dataとcomputedを以下のように変更します。
// pages/index.vue
data: function() {
  return {
    content: '',
    find_state: '',
    find_flg: false
  }
},
computed: {
  ...mapState(['todos']),
  display_todos:function(){
    if(this.find_flg){
      let arr = [];
      let data = this.todos;
      data.forEach(element =>{
        if(element.state == this.find_state){
          arr.push(element);
        }
      });
      return arr;
    }else{
      return this.todos;
    }
  }
}
dataにfind_stateとfind_flgを追加しました。
computedで、find_flgがtrueならば、find_stateとstateが一致するタスクだけ表示し、そうでなければ全て表示します。
computedで表示の方法をtodosからdisplay_todosに変えたので、リストのv-forを以下のように変更します。
<!-- pages/index.vue -->
<tr v-for="(item, index) in display_todos" :key="index"></tr>
絞り込みボタンにイベントを登録します。同時にv-bindを使ってクラスを切り替えるようにします。
<!-- pages/index.vue -->
<button class="button button--gray" v-bind:class="{'is-active':(!find_flg)}" @click="flag_reset">全て</button>
<button class="button button--gray" v-bind:class="{'is-active':find_flg && (find_state == '作業前')}" @click="find('作業前')">作業前</button>
<button class="button button--gray" v-bind:class="{'is-active':find_flg && (find_state == '作業中')}" @click="find('作業中')">作業中</button>
<button class="button button--gray" v-bind:class="{'is-active':find_flg && (find_state == '完了')}" @click="find('完了')">完了</button>
methodsにfindとflag_resetを登録します。
// pages/index.vue
find: function(findState){
  this.find_state = findState;
  this.find_flg = true;
},
flag_reset: function(){
  this.find_flg = false;
}
絞り込みボタンを押して、該当するステータスのみ表示されていれば完成です。
まとめ
Nuxt.jsを使うことで、普通にJavaScriptを書くよりも直感的に、簡単にTodoリストを作ることができました。
公式ドキュメントも日本語で用意されていますし、書籍なども多く出ているので、みなさんもぜひNuxt.jsを使ってみてはいかがでしょうか。
RECENT POSTS

Vol.198
親子関係から地域コミュニティへ──多様性を育み、関係をデザインする教育の未来

Vol.197
ビジョンと多様性、未来志向を組み入れた未来の環境デザインを考える

Vol.196
教育の多様性と未来を拓くビジョンメイキング──環境デザインから読み解く“これからの学び”

Vol.195
「One Health」と日本──人・動物・環境を一体で考える時代へ

Vol.194
AI時代におけるデジタル教育のメリットと課題、教育のこれから

Vol.193
AI時代にこそ必要なビジョンメイキングーーAIが変える“働く意味“と“組織のあり方“


